 记录一次博客搭建的过程
# 记录一次博客搭建的过程
# 前言
注意
如果你正在寻找本博客的搭建文档,博主建议您查看这个仓库的README (opens new window)。
此博客的开发环境的搭建过程,都是基于 macOS Monterey 操作系统,不同的系统存在差异。
# Quick Start
# 从github上拉取代码
# clone the project
git clone https://github.com/xugaoyi/vuepress-theme-vdoing.git

# enter the project directory
cd vuepress-theme-vdoing
1
2
3
4
5
2
3
4
5
# 安装相关依赖node、yarn
- install via Homebrew
# install nodejs(yarn依赖node,需提前安装)
brew install node

# install yarn
brew install yarn
1
2
3
4
5
2
3
4
5
window可直接去github下载 yarn安装包 (opens new window)
# 启动相关
- 开发环境启动
# 启动
yarn dev
1
2
2

服务启动过程中可能出现如上错误,添加相应的插件即可:
# 添加插件
yarn add dayjs
1
2
2
启动成功后,访问http://localhost:8080/即可进入个人博客页面
- (可选)推送博客相关内容链接给百度收录,需自行配置
baiduPush.sh文件中的地址

# 推送
yarn baiduPush
1
2
2
# 自动部署博客到腾讯云
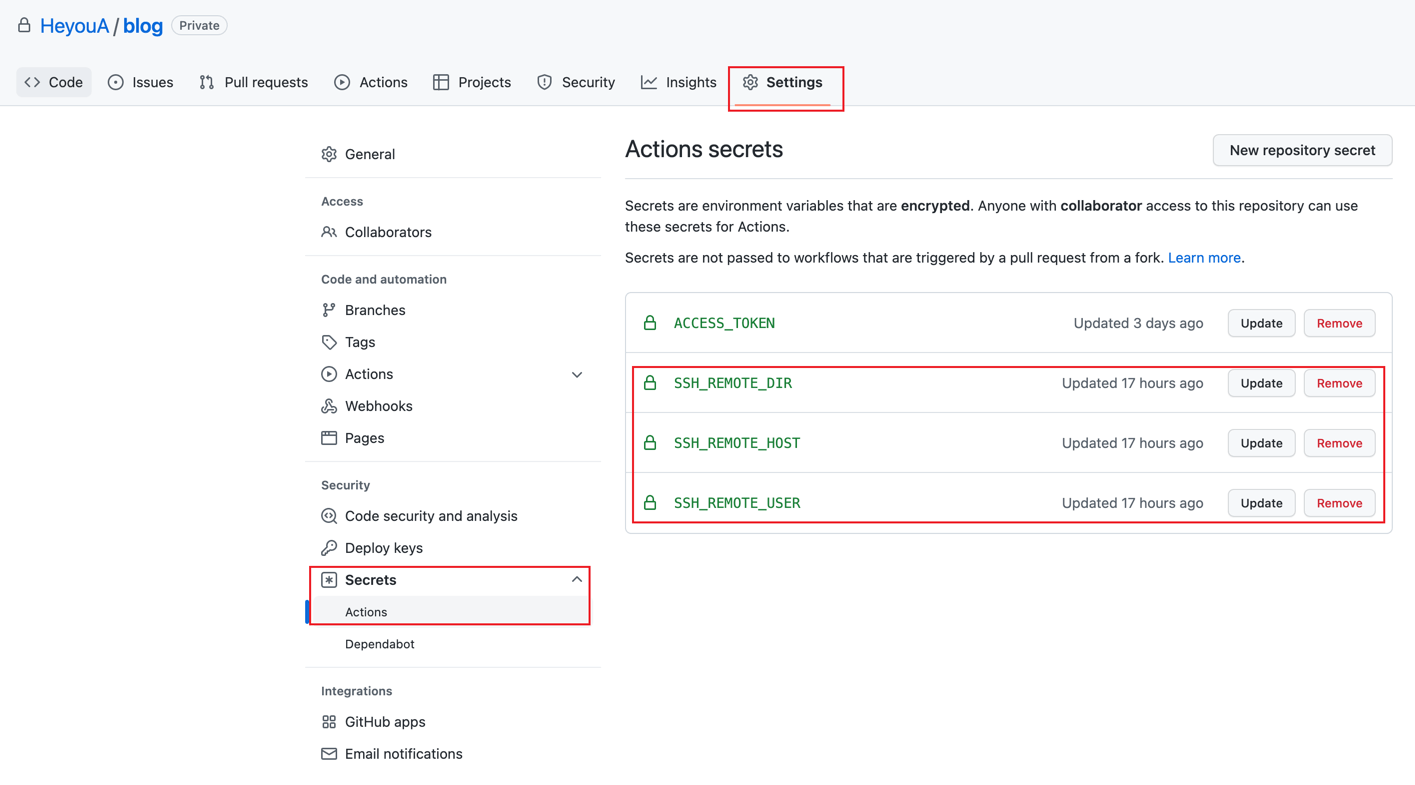
在github项目路径Settings->Secrets->Actions如下增加配置,对应
ci.yml中的四个变量:ACCESS_TOKEN SSH密钥
SSH_REMOTE_DIR 服务器部署目录
SSH_REMOTE_HOST 服务器地址
SSH_REMOTE_USER 服务器用户

修改
ci.yml文件
name: CI

#on: [push]

# 在master分支发生push事件时触发。
on:
  push:
    branches:
      - master

env: # 设置环境变量
  TZ: Asia/Shanghai # 时区(设置时区可使页面中的`最近更新时间`使用时区时间)

jobs:
  build: # 自定义名称
    runs-on: ubuntu-latest # 运行在虚拟机环境ubuntu-latest

    strategy:
      matrix:
        node-version: [12.x]

    steps:
      # 1.检出仓库
      - name: Checkout
        uses: actions/checkout@master # 使用的动作。格式:userName/repoName。 官方actions库:https://github.com/actions
        with:
          persist-credentials: false

      # 2.安装nodejs
      - name: Use Node.js ${{ matrix.node-version }}
        uses: actions/setup-node@v1
        with:
          node-version: ${{ matrix.node-version }}

      # 3.生成静态文件
      - name: Build
        run: npm install && npm run build

      #      # 4.部署到 GitHub Pages
      #      - name: Deploy
      #        uses: JamesIves/github-pages-deploy-action@releases/v3
      #        with:
      #          ACCESS_TOKEN: ${{ secrets.ACCESS_TOKEN }}
      #          REPOSITORY_NAME: 954118124/blog
      #          BRANCH: gh-pages
      #          FOLDER: docs/.vuepress/dist #注意这里是 npm run build 生成静态资源的路径:docs/.vuepress/dist

      # 4. 部署到腾讯云服务器
      - name: Deploy to Server
        uses: easingthemes/ssh-deploy@v2.0.7
        env:
          SSH_PRIVATE_KEY: ${{ secrets.ACCESS_TOKEN }} # 私钥
          # 复制操作的参数。"-avzr --delete"意味部署时清空服务器目标目录下的文件
          ARGS: "-avzr --delete"
          # 源目录,相对于$GITHUB_WORKSPACE根目录的路径
          SOURCE: "docs/.vuepress/dist/"
          # 服务器域名
          REMOTE_HOST: ${{ secrets.SSH_REMOTE_HOST }} # 公网ip
          # 腾讯云默认用户名为root
          REMOTE_USER: ${{ secrets.SSH_REMOTE_USER }}
          # 目标目录
          TARGET: ${{ secrets.SSH_REMOTE_DIR }} #/usr/local/software/blog
1
2
3
4
5
6
7
8
9
10
11
12
13
14
15
16
17
18
19
20
21
22
23
24
25
26
27
28
29
30
31
32
33
34
35
36
37
38
39
40
41
42
43
44
45
46
47
48
49
50
51
52
53
54
55
56
57
58
59
60
61
62
63
2
3
4
5
6
7
8
9
10
11
12
13
14
15
16
17
18
19
20
21
22
23
24
25
26
27
28
29
30
31
32
33
34
35
36
37
38
39
40
41
42
43
44
45
46
47
48
49
50
51
52
53
54
55
56
57
58
59
60
61
62
63
# 其它
# 图片放大插件vuepress-plugin-image-viewer (opens new window)
安装插件
# add plugins
yarn add vuepress-plugin-image-viewer
1
2配置插件,在
config.ts文件中plugins下添加插件[ 'vuepress-plugin-image-viewer', { selector: '.theme-vdoing-content', // 你想要的插件起作用的页面的class或id options: { excludeClass: 'no-zoom', // 要排除的class } }, ],1
2
3
4
5
6
7
8
9
